

Key takeaways
- Usually faster to load than a flat carrier once the cradle position is set.
- Uses roof width efficiently, especially for two kayaks.
- Fold-down mechanisms reduce garage-height problems.
- Commonly includes padded contact points and dedicated bow-and-stern tie-downs.
The best kayak roof racks depend on your vehicle’s roof-bar setup, kayak weight, loading height, and how often you transport the boat: choose a J-cradle for regular use, saddles for the most supportive hull contact, or a temporary carrier when you cannot leave hardware on the vehicle.
Our top picks


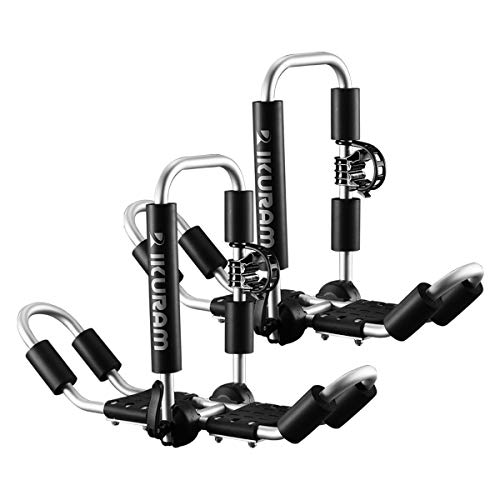
As an Amazon Associate we earn from qualifying purchases at no extra cost to you. Ratings are shown as listed on Amazon.
Quick picks by situation
| Situation | Best rack type | Why it fits | Main compromise |
|---|---|---|---|
| Weekly trips with one touring or recreational kayak | Fold-down J-cradle | Good side clearance, upright storage, and quick repeatable loading | Raises the kayak higher than a saddle |
| Heavy fishing kayak or delicate composite hull | Contoured saddle system | Supports more of the hull and spreads pressure over padded contact areas | Usually takes more roof width and costs more |
| Two kayaks on a wide vehicle | J-cradles or a J-cradle plus horizontal carrier | Uses vertical space and leaves room for a second boat | Higher lifting height and more wind resistance |
| Occasional use with no permanent roof bars | Temporary foam or inflatable carrier | Stores in a small bag and avoids permanent hardware | More sensitive to installation, door seals, and strap routing |
| Low garage clearance | Low-profile saddles | Minimizes added height above the crossbars | Often requires lifting the kayak directly onto the roof |
J-cradles: the best all-round choice for many vehicles
A J-cradle holds the kayak on its side at roughly a 45-degree angle. This leaves usable crossbar space for a second boat, cargo box, or bicycle, and it gives the paddler a defined cradle into which the kayak can be lowered. Fold-down models such as the Thule Hull-a-Port and Yakima JayLow are particularly useful when the vehicle must enter a garage between trips.
J-cradles suit most sit-inside and recreational sit-on-top kayaks with reasonably firm sidewalls. They work best when the crossbars are at least several inches wider than the mounting feet and when the bar spread falls within the rack’s instructions. A narrow roof can make the cradle sit too close to the vehicle’s doors or prevent two racks from fitting side by side.
Advantages
- Usually faster to load than a flat carrier once the cradle position is set.
- Uses roof width efficiently, especially for two kayaks.
- Fold-down mechanisms reduce garage-height problems.
- Commonly includes padded contact points and dedicated bow-and-stern tie-downs.
Limitations
- The kayak sits higher, increasing lifting effort and wind exposure.
- A very wide fishing kayak may not sit securely in a narrow J opening.
- Side loading can be awkward on tall SUVs without a step, roller, or loading assist.
For a first rack, a fold-down J-cradle with wide padded arms and cam-buckle straps is generally the easiest compromise between convenience, capacity, and price. Malone Downloader is another established J-style option, but confirm the exact model’s bar compatibility and weight limit before buying.
Saddles: lower loading height and better hull support
A saddle system carries the kayak upright on two or four padded supports that follow the hull’s underside. Unlike a J-cradle, it does not force the boat onto its side. This makes saddles attractive for heavier fishing kayaks, long touring kayaks, and composite boats whose hulls should not be compressed against a small contact area.
Saddles are also usually the easiest type to pair with load-assist rollers or sliding rear saddles. You can place the bow at the rear of the vehicle, lift only one end, and slide the boat forward while keeping much of its weight supported. That technique can matter more than a small difference in rack price.
| Typical specification | J-cradle | Saddle system | Temporary carrier |
|---|---|---|---|
| Typical kayak capacity | 1 kayak per pair; some systems carry 2 | 1 kayak per pair | Usually 1 kayak |
| Typical supported boat weight | 45–75 lb per kayak | 55–90 lb per kayak | 40–75 lb; check the carrier closely |
| Added height above crossbars | Approximately 10–18 in. | Approximately 3–8 in. | Approximately 2–5 in. |
| Contact material | Foam or rubber-coated metal arms | Molded supports with thick foam or rubber padding | Closed-cell foam or inflatable tubes |
| Typical installation time | 15–30 minutes initially | 20–40 minutes initially | 5–15 minutes, plus inflation or pad positioning |
| Best roof type | Raised or flush crossbars | Strong crossbars with adequate spread | Factory roof with usable door-frame seals or compatible temporary mounting points |
Rhino-Rack Nautic saddles and similar systems are sensible choices when the hull needs broad, padded support. The critical measurement is not just the kayak’s length; check its width, hull shape, and the distance between the rack’s front and rear supports. A long boat with a sharply curved hull may contact a saddle unevenly.
Temporary carriers: practical, but less forgiving
Foam block kits and inflatable carriers such as the Malone HandiRack are designed for people who use a kayak a few times each season or drive a vehicle without permanent crossbars. They are compact and relatively inexpensive, but they depend on correct placement and a sound vehicle roof.
Temporary carriers should sit on strong roof sections, not over a fragile panoramic roof panel or unsupported sheet metal. Door seals must close without crushing the straps, and the straps should be tightened enough to stop movement without deforming the roof or creating excessive pressure on the kayak.
These carriers are best for moderate speeds, short-to-medium journeys, and lighter kayaks within the stated limit. They are a poor choice for leaving the kayak loaded for days, driving in severe crosswinds, or transporting a very heavy fishing kayak. Foam can also absorb water and grit; dry it fully before storage.
Fit and capacity: the checks that prevent expensive mistakes
- Measure the vehicle roof: record the crossbar width, bar spread, bar shape, and distance from the bars to the nearest hatch or antenna.
- Check dynamic roof capacity: the limit applies while driving, not merely while parked. Add the kayak, rack, straps, and accessories together.
- Account for the rack: a 55-pound kayak on a 12-pound carrier places about 67 pounds on the roof before straps and other equipment are included.
- Check the kayak’s contact points: avoid resting a rudder, skeg, hatch cover, pedal-drive mechanism, or sharp chines on the padding.
- Measure garage height: add the vehicle height, crossbars, rack height, and the kayak’s tallest point. A fold-down J-cradle only helps when folded before entry.
As a simple example, suppose a vehicle has a 165-pound dynamic roof limit, the carrier weighs 15 pounds, and a loaded fishing kayak weighs 78 pounds. The working load is 93 pounds, leaving 72 pounds of nominal capacity. That margin is useful, but it does not override a rack’s lower maximum or make an unsuitable bar spread safe.
Installation and tie-down security
Install the carrier symmetrically, tighten each mounting clamp gradually, and recheck it after the first short drive. The rack should not slide, rock, or rotate when pushed by hand. Padding must be clean and fully seated; trapped sand can scratch the hull.
- Position the rack within the manufacturer’s permitted bar-spread range.
- Place the kayak so its strongest hull sections rest on the padded supports.
- Run one strap around the front half and one around the rear half, keeping buckles away from paint where possible.
- Use cam buckles rather than ratchets for the kayak body. Ratchets can crush a hull or over-compress foam.
- Attach bow and stern lines to real vehicle recovery points or dedicated tie-down points, not plastic bumpers or wiper arms.
- Bundle loose strap ends so they cannot flap against the paint or reach a wheel.
The body straps hold the kayak down against the carrier; bow and stern lines control fore-and-aft movement. They are not substitutes for one another. Stop after 10–15 minutes and inspect for strap loosening, hull movement, or a shifted rack. Repeat the check at fuel stops.
Durability and ownership costs
The first parts to wear are usually foam edges, rubber pads, cam-buckle webbing, and plastic release levers. UV exposure makes straps brittle, while grit between a kayak and a pad can dull or scratch the finish. Rinse salt and road grime from metal clamps, dry the padding, and store the rack out of direct sunlight.
Do not lubricate friction clamps unless the manufacturer permits it; oily surfaces can reduce grip. Replace webbing when it is frayed, stiff, sun-faded, or cut. Replacement straps and pads are normally cheaper than replacing a kayak, and they can extend a rack’s useful life by several seasons.
Final buying recommendation
Choose a fold-down J-cradle if you regularly carry one or two conventional kayaks and can comfortably lift them to roof height. Choose padded saddles if hull support, low height, or load-assist capability matters more than maximum roof-space efficiency. Choose a temporary foam or inflatable carrier when compact storage and occasional use outweigh the extra installation checks.
Whatever style you select, the best kayak roof racks are the ones whose weight limit, bar compatibility, hull support, and tie-down points match both the kayak and the vehicle—not simply the rack with the largest advertised capacity.





Write Your Review
No reviews yet. Be the first to share your experience!