

Key takeaways
- Vacuum or wipe dust from the intake screen and fan pre-filter every few weeks.
- Wash the removable floor tray between crop cycles and dry it completely.
- Inspect zipper teeth, pole joints, hanging straps, and duct clamps monthly.
- Replace carbon filters when odor control declines or according to the manufacturer’s service guidance.
- Keep water and nutrient spills away from power strips and light drivers.
The best grow tent kits depend on how much floor space you have, how many plants you want to raise, and whether you already own a suitable grow light; for most beginners, a 2-by-4-foot kit with a 200–300W LED, a 6-inch inline fan, and a height of at least 6.5 feet offers the most useful balance.
Our top picks


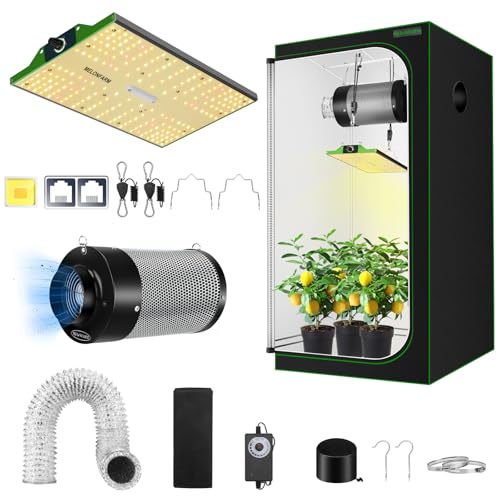

As an Amazon Associate we earn from qualifying purchases at no extra cost to you. Ratings are shown as listed on Amazon.
Best grow tent kits at a glance
| Best for | Typical kit size | Typical light | Ventilation | Approximate plant capacity | General market range |
|---|---|---|---|---|---|
| Small room or first indoor garden | 2 × 2 × 4.5–5 ft | 100–150W LED | 4-inch inline fan | 1–2 medium plants or 4–6 small plants | $180–$350 |
| Most versatile setup | 2 × 4 × 6.5–7 ft | 200–300W LED | 6-inch inline fan | 2–4 medium plants or 6–10 small plants | $300–$600 |
| Shared household or larger harvests | 4 × 4 × 6.5–7 ft | 400–600W LED | 6-inch or 8-inch inline fan | 4–9 medium plants or 12–20 small plants | $450–$900 |
| Propagation and compact herbs | 2 × 2 × 4 ft | 60–100W LED | 4-inch fan or passive airflow | One shelf of seedlings or 6–12 small pots | $120–$280 |
These capacities are practical estimates rather than fixed limits. A plant’s mature canopy, pot size, training method, and access space matter more than the number of pots printed on a product box.
Our picks by growing situation
Best all-rounder: a 2 × 4-foot LED kit
A 2 × 4-foot tent fits against a wall, uses less electricity than a 4 × 4, and provides a long rectangular footprint for two larger plants or several compact ones. Look for a full-spectrum LED rated around 200–300W at the wall, a dimmer, and a 6-inch inline fan with speed control.
Brands such as AC Infinity, Spider Farmer, VIVOSUN, and Mars Hydro offer equipment in this category. Complete packages vary: some include a carbon filter, ducting, timer, and fabric pots, while others include only the tent, light, and fan. A 2 × 4 kit is the sensible choice when you want room to learn without committing an entire room corner to indoor gardening.
Best for a very small room: a 2 × 2-foot kit
A 2 × 2 tent has a 4-square-foot footprint, so it can fit in a closet-sized area or beside a workbench. It is suitable for seedlings, herbs, leafy greens, and one carefully managed larger plant. A 100–150W LED is usually enough for this area, provided the fixture distributes light evenly rather than concentrating it in a narrow central beam.
The trade-off is vertical and thermal space. Short tents leave less room for the pot, light fixture, and safe distance between the light and plant canopy. Check the assembled height before buying, particularly if the tent will sit under a low ceiling or shelf.
Best for maximum flexibility: a 4 × 4-foot kit
A 4 × 4 tent gives 16 square feet of growing area and is the strongest choice for a serious home garden, but it needs a dedicated corner and more electrical capacity. A 400–600W LED is common, along with a 6-inch or 8-inch ventilation system. Four medium plants can be spaced comfortably, while a larger number of small plants can fill the same area.
Do not choose a 4 × 4 merely because it offers more plant capacity. The larger light, fan, and carbon filter increase the purchase price, noise, heat output, and ongoing electricity use. It is worthwhile when you expect to use the full footprint regularly.
What separates a good kit from a frustrating one?
Dimensions and usable height
Measure the entire installation, not just the floor. A nominal 6.5-foot tent may need additional clearance for ducting, power cords, and the inline fan. Subtract the pot height, light thickness, and a safe light-to-canopy distance from the advertised tent height. For example:
78-inch tent − 14-inch pot − 3-inch light − 18-inch light clearance = 43 inches of usable plant height.
That remaining height is adequate for compact plants but restrictive for tall varieties. A taller tent is often more valuable than extra floor area if your room allows it.
Reflective lining
Most grow tents use a reflective polyester interior, commonly marketed as Mylar or a Mylar-like lining. Look for a tightly sewn, bright interior with reinforced seams and a removable, waterproof floor tray. Reflectivity helps redirect stray light, but it cannot compensate for an undersized or poorly distributed fixture.
Blackout quality also matters. Light leaks usually appear around zippers, viewing windows, cable ports, and lower corners. A double-stitched zipper flap and overlapping fabric reduce leaks and help contain odor and humidity.
Frame strength
Small tents commonly use steel or powder-coated metal poles around 16–19 mm in diameter. Larger tents benefit from thicker poles, strong corner connectors, and a horizontal support bar for the light and ventilation equipment. A carbon filter can weigh several kilograms, so confirm whether the kit expects it to hang inside the tent or sit outside.
A wobbly frame is more than an annoyance: repeated movement can stress zippers, loosen duct connections, and cause a hanging light to swing. For a 4 × 4 tent, prioritize metal corner joints and multiple crossbars over decorative accessories.
Ventilation ports and access
A useful kit should have at least one upper exhaust port, one lower intake port, and several cable socks. Six-inch ports are the most versatile for medium tents because compatible fans, ducting, and filters are widely available. Four-inch ports suit compact 2 × 2 installations.
More ports are not automatically better. Unused openings need to close securely, and oversized ports can complicate installation. Check that the port sleeves accept the actual duct diameter rather than relying only on the tent’s overall dimensions.
Included lighting
Compare actual power draw, not a marketing number such as “equivalent wattage.” For a rough starting point, many indoor gardens use approximately 25–40 watts of efficient LED power per square foot, depending on the crop and growth stage. A 2 × 4 tent therefore commonly pairs with a 200–300W fixture, while a 4 × 4 often uses 400–600W.
Prefer dimmable, full-spectrum LED boards with a published power rating and a timer or compatible timer connection. Some kits include a basic timer; others require you to supply one. A light with separate dimming and hanging points is easier to adjust as plants grow.
Head-to-head: complete kit or separate components?
| Factor | Complete kit | Separate components |
|---|---|---|
| Initial buying effort | Low; compatible basics arrive together | Higher; every connector and size must match |
| Customization | Limited to the included light and fan | Excellent; upgrade each part independently |
| Value | Often economical for beginners | Can cost less when you already own equipment |
| Noise and controls | May include a basic controller or speed dial | You can select quieter fans and better controls |
| Long-term ownership | Replacement parts may not match perfectly | Standard 4-inch and 6-inch parts are easier to replace |
A kit from AC Infinity is particularly appealing when integrated fan and controller features are important. Spider Farmer, VIVOSUN, and Mars Hydro also sell widely available tent-and-light packages in common 2 × 2, 2 × 4, and 4 × 4 sizes. If you already own a quality LED, fan, or timer, buying a tent by itself may avoid paying twice for equipment you do not need.
Assembly and maintenance realities
Assemble the frame first on a clean floor, then install the fabric shell with the zippers partly open. This reduces strain on the seams. Attach the light before placing plants inside, and leave enough slack in the power cord to prevent tension on the connector. Run ducting in broad curves rather than sharp bends, since every tight bend reduces airflow.
Most kits need the following ongoing care:
- Vacuum or wipe dust from the intake screen and fan pre-filter every few weeks.
- Wash the removable floor tray between crop cycles and dry it completely.
- Inspect zipper teeth, pole joints, hanging straps, and duct clamps monthly.
- Replace carbon filters when odor control declines or according to the manufacturer’s service guidance.
- Keep water and nutrient spills away from power strips and light drivers.
The parts that usually wear first are zipper tracks, fabric around over-tightened ports, fan pre-filters, and carbon filters. Common mistakes include hanging a heavy filter from a single weak strap, blocking the lower intake with a wall, and buying a high-powered light for a short tent that cannot dissipate the heat.
Final buying decision
Choose a 2 × 2 kit for propagation, herbs, or a single compact plant in a restricted room. Choose a 2 × 4 kit for the best overall balance of capacity, cost, and manageable ventilation. Choose a 4 × 4 kit only when you can dedicate at least 16 square feet of floor area and are prepared for higher light output, airflow, and electricity use.
Before ordering, verify five numbers: the assembled tent height, the light’s actual wall wattage, the fan and duct diameter, the frame’s support bars, and the number of plants your mature canopies—not your starter pots—will require. Those details predict the ownership experience far better than a long accessory list.





Write Your Review
No reviews yet. Be the first to share your experience!